Let’s try making soap from used cooking oil with ARE-310
November 19, 2019|Topic

Let’s try making soap from used cooking oil with ARE-310
This time, we will try making soap from used cooking oil with Thinky Mixer ARE-310.
Did you know that you can make soap from used cooking oil, such as oil for deep frying? It is also called recycled soap because it reduces used oil waste and is thus eco-friendly.
The only ingredients needed are used cooking oil, NaOH (caustic soda), and water. You can make soap by mixing these three ingredients well at fixed amounts. The soap will be very useful for getting stubborn dirt off your clothes or washing dishes.
How to make soap
Ingredients
| Experiment 1 | Experiment 2 | |
|---|---|---|
| Used cooking oil | 100ml | 100ml |
| Water | 20ml | 30ml |
| NaOH (caustic soda flakes) | 12g | 15g |
Procedure
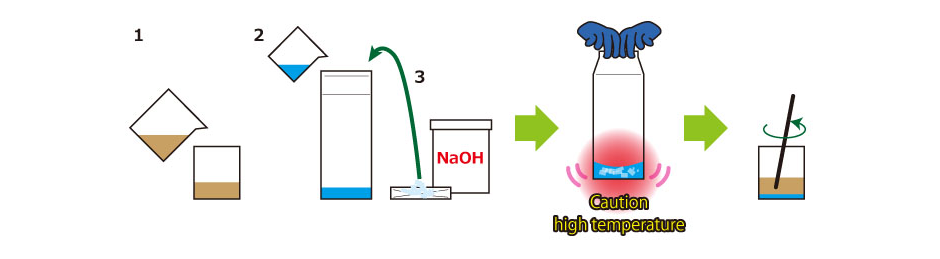
1. Add 100 ml of used cooking oil into a 300-ml container.
2. Add water (the amount shown above) into a milk carton.
3. Add NaOH (the amount shown above) to water in 2, seal the carton lid, and mix. (*Be careful as the reaction generates heat and gas!)
4. When the flakes disappear (the mixture becomes transparent), add it into the oil in 1.
5. Mix well (manual mixing/ARE-310) until the consistency becomes stew-like.
6. Let it dry in a well-ventilated place. (1 month or more)
Experiment 1
(1) Manual mixing/(2) Mixing with ARE-310
As soon as the used cooking oil was mixed with NaOH aqueous solution, saponification began and the mixture became viscous.
We mixed it for 40 minutes with (1) manual mixing and 13 minutes with (2) ARE-310 until the mixture had a light, stew-like consistency. In both (1) and (2), the mixture became cloudy compared to when mixing was started, but did not become viscous enough to reach the “trace” state (i.e., the state in which a line can be drawn on the soap dough).
The upper temperature limit of the 300-ml container used in these experiments was 80oC. The dissolution of NaOH in water generated much heat (over 70oC in Step 3 of the procedure), and considering that the temperature of the ingredients increases due to the rotating motion of ARE-310, we started mixing them when the temperature of the NaOH aqueous solution became slightly lower. The temperature was 37oC before mixing, and thereafter, the temperature was measured every 60 seconds as we checked the condition of the contents. Contrary to our expectations and worries, the temperature increase was small, and each time it was measured, the temperature was almost unchanged between 30oC and 40oC.
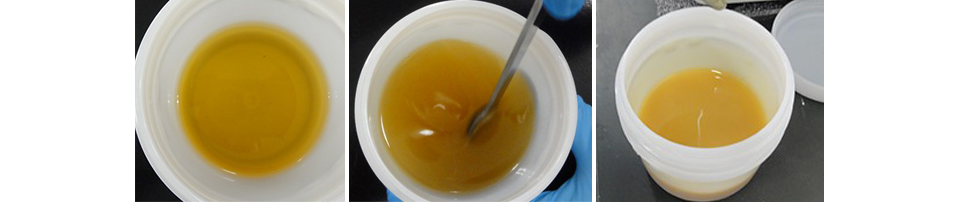
Experiment 1 Left: Oil only, Middle: Start of oil and NaOH aqueous solution mixing, Right: End of mixing
Experiment 2
(3) Manual mixing/(4) Mixing with ARE-310)?The amount of NaOH was increased?
Because the viscosity did not quite reach the level we had expected, in Experiment 2, we increased the amount of NaOH. Also, because we had confirmed that the temperature of the mixture did not exceed the upper temperature limit of the container, we quickly combined the NaOH aqueous solution dissolved in Step 4 with oil and started mixing while the temperature was still high.
In Experiment 2, an increase in viscosity was noted at an early stage compared to Experiment 1, and a stew-like consistency was achieved after 15 minutes with (3) manual mixing and 10 minutes with (4) ARE-310.
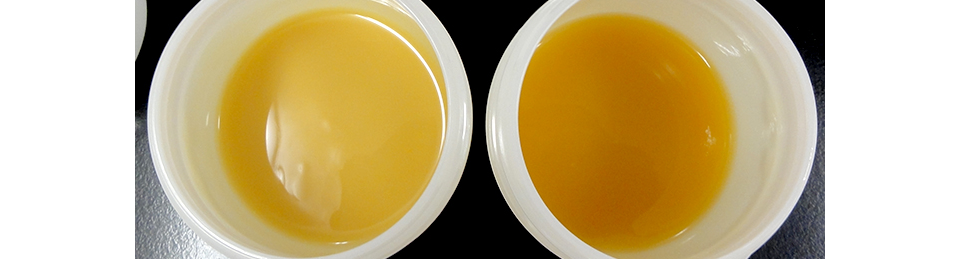
Experiment 2 Left (4) ARE-310, Right (3) Manual mixing (trace appeared on the surface)
<!–
In the present experiments, because we were concerned about the upper temperature limit of the container used, it was necessary to check the temperature. We were able to do away with the temperature checking process by leaving the temperature measurements to the multi-sensor. The sensor measured the temperature during mixing in real time, giving us a sense of security while we kept our eyes on the gentle slope of the graph and continued mixing.
For those who are concerned with changes in temperature of the material during mixing, please try this multi-sensor.

The multi-sensor gives you peace of mind as it lets you see the change in temperature in real time (Left: Experiment 1/Right: Experiment 2)
–>
Experimental results ?Dried for 3 months in a container?
The mixtures were left to dry in the containers at the emergency exit landing (outdoors). Although we could not avoid getting dust and tiny debris on their surfaces, the mixtures solidified and the stew-like consistency changed quite a bit compared to right after mixing.
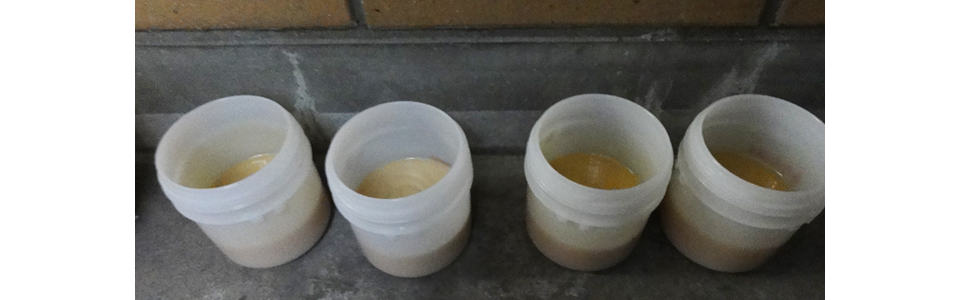
1. Surface appearance
| Mixing duration | Surface appearance | ||
|---|---|---|---|
| (1) Experiment 1 Manual mixing |
40 (minutes) | Used cooking oil pigments (?) gave a spotty appearance |
It was so soft that when pressed with fingers, a mark was left (clay-like consistency) |
| (2) Experiment 1 ARE-310 |
13 (minutes) | Used cooking oil pigments (?) gave a spotty look |
It was hard and did not deform when pressed with fingers. Smooth |
| (3) Experiment 2 Manual mixing |
15 (minutes) | White | It was hard and did not deform when pressed with fingers. Smooth |
| (4) Experiment 2 ARE-310 |
10 (minutes) | Whiter than (3) | It was hard and did not deform when pressed with fingers. Smooth |
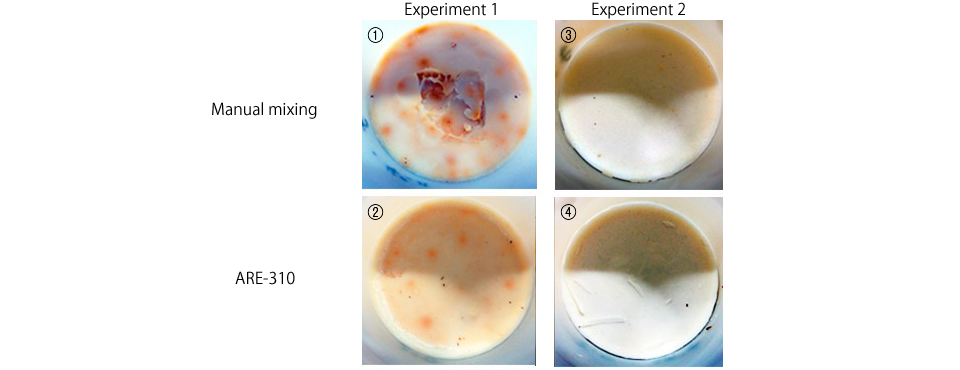
2. Appearance of cut surface
As the soaps were hard and could not be taken out of the containers easily, we cut the containers in half with a saw to examine the contents.

Both the ones with a spotty surface (1) (2) and those with a white surface (3) (4) had two layers, and the contents overall were uniformly yellow with no differences in color among the four. Some said they looked tasty, like Camembert cheese…
3. Hardness comparison
We removed the soaps from the containers. As for (1), not only the surface but the whole thing was soft as well, and it deformed considerably when it was being removed from the container. The surfaces of (2), (3), and (4) were hard and smooth, and although there was a slight smell of used oil, overall, they were successfully made into soap with no stew-like consistency that was observed right after mixing.
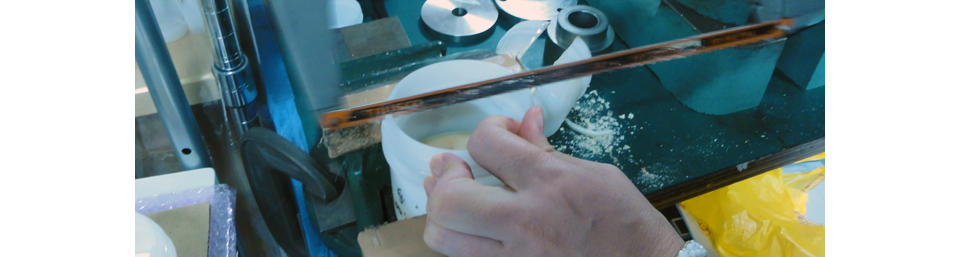
We then checked their hardness by sticking a chopstick into their cut surfaces.
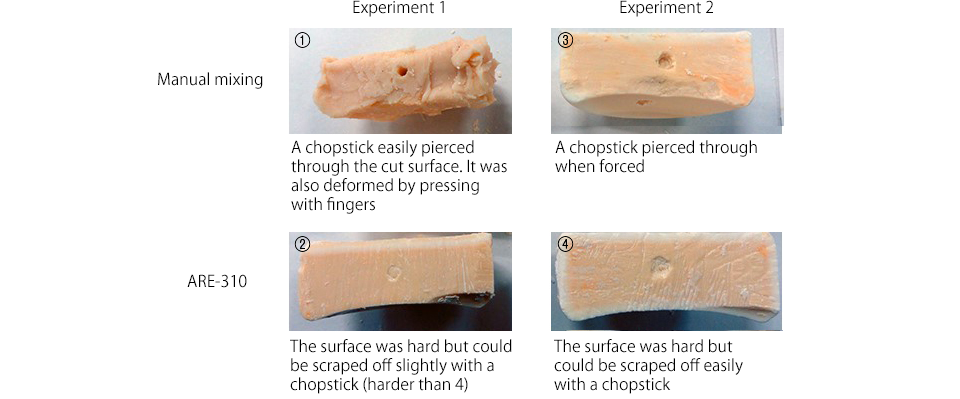
Appearance of cut surface
Results of hardness comparison
(2) Experiment 1 (ARE-310) > (4) Experiment 2 (ARE-310) > (3) Experiment 2 (manual mixing) >> (1) Experiment 1 (manual mixing)
Soap making = Relationship between saponification and ARE-310
Soap is made by a reaction called saponification.
Fat (triglyceride) is hydrolyzed into fatty acids and glycerol when an alkali (NaOH) and water are added, and fatty acid sodium salt (soap) is formed from the resulting fatty acids and sodium.
Three factors that promote the saponification reaction and discussion of experimental results
1. Mixing
Because the saponification reaction takes place at the interface between the oil and NaOH aqueous solution, the reaction is promoted as the interface area is increased by mixing and dispersing the NaOH aqueous solution into the oil. In addition, because the soap film formed by the reaction can disrupt and prevent the reaction from progressing, it is necessary to remove the film by mixing.
↓
In both Experiments 1 and 2, mixing with ARE-310 resulted in the formation of harder soap (i.e., saponification progressed further) than manual mixing. The difference in the amount of water might explain why the soap produced in (2) Experiment 1 (ARE-310) was harder than that produced in (4) Experiment 2 (ARE-310).
2. Temperature
In Experiment 1, we were too concerned about the upper temperature limit of the container, so we did not pour the heated NaOH aqueous solution immediately into the oil; consequently, mixing was performed between 30oC and 40oC, which likely resulted in the lowering of the reaction rate. Given that mixing was performed between 40oC and 50oC in Experiment 2, temperature might have contributed to reaching the trace state in an early stage, whereas in Experiment 1, this was not clearly observed. Still, this is just a speculation as the experiments were not carried out at the same concentration.
3. Emulsifier
Surface-active agents (surfactants) can further promote the interfacial reaction. It is thus possible to accelerate the saponification reaction by adding a surfactant from the beginning. As soap generated by the saponification reaction is a surfactant itself, mixing causes soap to form micelles that act as emulsifiers, and this in turn increases the area of stable interfaces in the liquid and further promotes the saponification reaction.
↓
In the present experiments, ARE-310’s powerful mixing also allowed for mechanical emulsification without the addition of an emulsifier, so the saponification reaction was likely promoted even more.
After all, when it comes to mixing, Thinky Mixer is the right choice!!
The soap made by manual mixing in Experiment 1 was soft even after 3 months and did not quite look like or work as soap, so we were relieved that our results demonstrated that ARE-310 mixing was in fact successful and different from manual mixing. On the other hand, the surface appearance did not differ between the two soaps obtained in Experiment 2, and compared to Experiment 1, the soaps from Experiment 2 looked more like soap, so we expected that the larger amount of NaOH aqueous solution, rather than mixing, was more important.
However, when we poked the cut surface with a chopstick, the one made with manual mixing was soft, whereas the one made with ARE-310 mixing was hard, so there was a clear difference in hardness. We were happy as these results suggest that the “THINKER MIXER is great at mixing!”
With regard to soap making (saponification) as well, we found that the characteristics of THINKY MIXER could be utilized. In the same manner as that of other materials, manual mixing tends to leave some parts unreacted. We wondered, for example, whether increasing the mixing duration would have changed the way the trace state was achieved… but while we were tempted to do follow-up experiments, the present experiments were actually “pre-experiments” for soap making with a large machine.
We are preparing for experiments with a large machine for the next report. Please stay tuned.
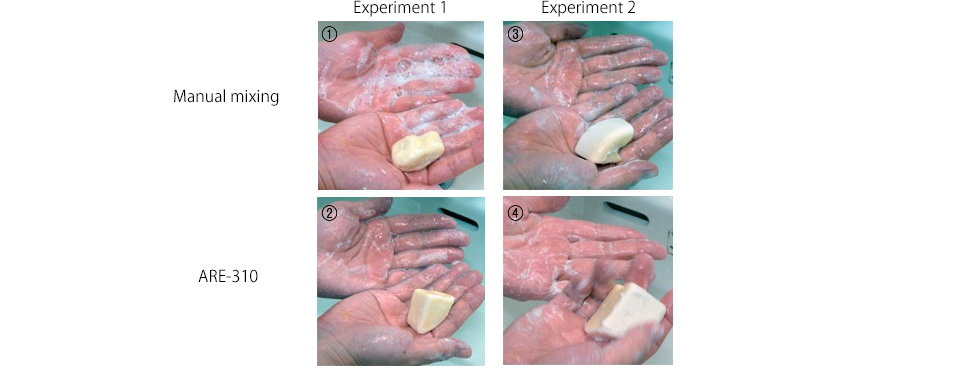
Bonus?Handwashing
We tried washing our hands using the soaps we had made.
(1) was soft so the melting amount and speed were both high, creating large bubbles. (2), (3), and (4) had finer bubbles than (1). After washing, our hands were very dry as the soaps washed away the natural oils in the skin. All of them appeared to have powerful washing power. The degreasing power was so strong that we wanted to put hand cream on every hour after the handwashing experiment! We recommend wearing rubber gloves when using these soaps.